How to Integrate AWS
What is this guide about? This guide explains how to integrate your AWS platform into meshStack. This is a required step to enable self-service AWS account provisioning, metering, billing, and authorization management within meshStack.
Prerequisites
- Access to a Platform Builder UI in meshStack.
- Admin access to the AWS Management Console and an AWS Organization.
- Two new meshStack dedicated AWS accounts: meshcloud and automation.
- Access to the billing console
Best Practice Integration
The recommended way to set up AWS as a meshPlatform is via the public OpenTofu AWS platform module. If you use the OpenTofu module, the manual steps below are not required.
Step-by-Step Guide for Manual Integration
1. Set Up AWS Account 1: meshcloud
In the meshcloud AWS account, create a new IAM policy as shown below (e.g., MeshstackAssumeRolePolicy). Replace the placeholders MANAGEMENT_ACCOUNT_ID, AUTOMATION_ACCOUNT_ID, and EXTERNAL_ID with your specific values.
Security Note: Generate a unique, random value for
EXTERNAL_ID(e.g., a UUID). Using anExternalIdprevents the "confused deputy" problem. Refer to the AWS ExternalId documentation for details.
MeshstackAssumeRolePolicy
{
    "Version": "2012-10-17",
    "Statement": [
        {
            "Sid": "",
            "Effect": "Allow",
            "Action": "sts:AssumeRole",
            "Resource": "arn:aws:iam::<<MANAGEMENT_ACCOUNT_ID>>:role/MeshfedServiceRole",
            "Condition": {
                "StringEquals": {
                    "sts:ExternalId": "<<EXTERNAL_ID>>"
                }
            }
        },
        {
            "Sid": "",
            "Effect": "Allow",
            "Action": "sts:AssumeRole",
            "Resource": "arn:aws:iam::<<AUTOMATION_ACCOUNT_ID>>:role/MeshfedAutomationRole",
            "Condition": {
                "StringEquals": {
                    "sts:ExternalId": "<<EXTERNAL_ID>>"
                }
            }
        }
    ]
}
Authentication option
Choose one of the following methods for the meshcloud account to authenticate with the management account:
Option A: Workload Identity Federation Recommended In the meshcloud AWS account, navigate to IAM > Identity Providers and create a new OpenID Connect provider. Enter the "Provider URL" and "Audience" values found in the meshStack AWS platform configuration panel. You can find these under the Replication Configuration section when Workload Identity Federation is selected (corresponding to the issuer and audience parameters). Create a new identity federation role MeshstackAssumeRoleIF and attache the policy MeshstackAssumeRolePolicy created in the previous step. Add following trust relationship to the new role.
{
    "Version": "2012-10-17",
    "Statement": [
        {
            "Effect": "Allow",
            "Principal": {
                "Federated": "<meshStack identity provider ARN>"
            },
            "Action": "sts:AssumeRoleWithWebIdentity",
            "Condition": {
                "StringEquals": {
                    "<meshStack identity provider name>:sub": "<replicator subject from meshStack>",
                    "<meshStack identity provider name>:aud": "<audience from meshStack>"
                }
            }
        }
    ]
}
- replace
meshStack identity provider ARNwith the provider ARN created in the previous step - replace
meshStack identity provider namewith the issuer name, withouthttps:// - replace
replicator subject from meshStackwithreplicator_subjectvalue - replace
audience from meshStackwithaudiencevalue
Option B: IAM User Create a user named meshfed-service-user with programmatic access and attach the MeshstackAssumeRolePolicy directly.
2. Set Up AWS Account 2: Management
Security Note: The demonstrated IAM Policies implement the minimum of configuration required to produce a working AWS integration using meshStack AWS Connector. This setup is based on the default AWS Organization configuration. We advise platform engineers to determine the specific needs and requirements for their usage of AWS and implement more restrictive roles and policies.
In the management account, create the MeshfedServiceRole and attach the policy below. This role allows meshStack to manage accounts and OUs.
{
    "Version": "2012-10-17",
    "Statement": [
        {
            "Sid": "StsAccessMemberAccount",
            "Effect": "Allow",
            "Action": "sts:AssumeRole",
            "Resource": "arn:aws:iam::*:role/MeshstackAccountAccessRole"
        },
        {
            "Sid": "OrgManagementAccess1",
            "Effect": "Allow",
            "Action": [
                "organizations:UntagResource",
                "organizations:TagResource",
                "organizations:MoveAccount",
                "organizations:ListTagsForResource",
                "organizations:ListParents",
                "organizations:ListOrganizationalUnitsForParent",
                "organizations:DescribeOrganizationalUnit",
                "organizations:DescribeAccount"
            ],
            "Resource": [
                "arn:aws:organizations::<<MANAGEMENT_ACCOUNT_ID>>:root/o-*/r-*",
                "arn:aws:organizations::*:ou/o-*/ou-*",
                "arn:aws:organizations::*:account/o-*/*"
            ]
        },
        {
            "Sid": "OrgManagementAccess2",
            "Effect": "Allow",
            "Action": [
                "organizations:ListRoots",
                "organizations:ListAccounts",
                "organizations:DescribeCreateAccountStatus",
                "organizations:CreateAccount"
            ],
            "Resource": "*"
        },
        {
            "Sid": "OrgManagementAccessSSO",
            "Effect": "Allow",
            "Action": [
                "sso:ListAccountAssignments",
                "sso:CreateAccountAssignment",
                "sso:DescribeAccountAssignmentCreationStatus"
            ],
            "Resource": [
              "<<AWS_SSO_INSTANCE_ARN>>",
              "arn:aws:sso:::permissionSet/*/*",
              "arn:aws:sso:::account/*"
            ]
        }
    ]
}
Replace the placeholders MANAGEMENT_ACCOUNT_ID and AWS_SSO_INSTANCE_ARN with your specific values.
In order to enable meshStack to close AWS accounts as part of tenant deletion, please also include the following statement. We strongly recommend you constrain the permission to close accounts to those OUs you use in your landing zones using an ResourceOrgPath.
{
    "Action": "organizations:CloseAccount",
    "Condition": {
        "ForAnyValue:StringLike": {
            "aws:ResourceOrgPaths": [
                "o-orgid/r-rootid/ou-ouid/*"
            ]
        }
    },
    "Effect": "Allow",
    "Resource": "arn:aws:organizations::*:account/o-*/*",
    "Sid": "OrgManagementAccessCloseAccount"
}
Configure the MeshfedServiceRole with the trust relationship below. This enables cross-account access for the meshcloud AWS account. In the Principal section of the trust relationship, include only the ARN (User or Role) that matches your specific meshcloud AWS account setup (either Workload Identity Federation or an IAM user with credentials).
Replace the following placeholders with your specific values:
MESHCLOUD_ACCOUNT_ID: The ID of the dedicated meshcloud AWS account where you configured the identity provider or themeshfed-service-user.EXTERNAL_ID: The unique identifier defined previously in theMeshstackAssumeRolePolicy.
{
  "Version": "2012-10-17",
  "Statement": [
    {
      "Sid": "",
      "Effect": "Allow",
      "Principal": {
        "AWS": [
          "arn:aws:iam::<<MESHCLOUD_ACCOUNT_ID>>:role/MeshstackAssumeRoleIF",
          "arn:aws:iam::<<MESHCLOUD_ACCOUNT_ID>>:user/meshfed-service-user"
        ]
      },
      "Action": "sts:AssumeRole",
      "Condition": {
        "StringEquals": {
          "sts:ExternalId": "<<EXTERNAL_ID>>"
        }
      }
    }
  ]
}
For Enrollment with AWS Control Tower, the
MeshfedServiceRoleneeds to have extra permissions to invoke the Account Factory. More information on that can be found at AWS Guide. To make use of these permissions, there must be an available launch path defined in AWS Service Catalog, as stated also in the prerequisites.
Managing the AWS Management Account as a meshStack Tenant with AWS SSO
If you want the AWS management (root) account itself to be managed as a meshStack tenant with AWS SSO group assignments,
additional IAM permissions are required on the MeshfedServiceRole.
For member accounts, AWS SSO provisions the required SAML provider and IAM roles for permission sets by assuming the
AccountAccessRole (by default MeshstackAccountAccessRole), which has administrator access. For the management account, AWS does not perform
a cross-account role assumption. Instead, AWS SSO performs these IAM operations using the caller's identity directly.
This is an AWS-internal behavior that cannot be changed. Since meshStack uses the MeshfedServiceRole to call
sso:CreateAccountAssignment, AWS SSO will attempt operations like creating the SAML provider and IAM roles for
permission sets under that same role. Without the necessary IAM permissions, the account assignment will fail with an
access denied error (for example 403 Access Denied).
This is not a meshStack-specific limitation. AWS documents that granting access on the management account requires
IAMFullAccess (or equivalent permissions), while this additional restriction does not apply to member accounts.
You can also see the IAM-level foundation for this in the AWS managed policy reference:
The AWSSSOServiceRolePolicy includes IAM role and SAML provider provisioning actions (for example,
iam:CreateRole, iam:AttachRolePolicy, iam:UpdateAssumeRolePolicy, iam:CreateSAMLProvider,
iam:UpdateSAMLProvider). Therefore, when meshStack calls sso:CreateAccountAssignment via MeshfedServiceRole,
that role needs equivalent IAM permissions on the management account.
Add the following additional statement to the MeshfedServiceRole policy, scoped to the management account:
{
  "Sid": "OrgManagementAccessAdditionalSSOForRootAccount",
  "Effect": "Allow",
  "Action": [
    "iam:GetRole",
    "iam:ListAttachedRolePolicies",
    "iam:ListRolePolicies",
    "iam:GetSAMLProvider",
    "iam:CreateRole",
    "iam:AttachRolePolicy",
    "iam:UpdateAssumeRolePolicy"
  ],
  "Resource": [
    "arn:aws:iam::<<MANAGEMENT_ACCOUNT_ID>>:saml-provider/*",
    "arn:aws:iam::<<MANAGEMENT_ACCOUNT_ID>>:role/*"
  ]
}
Replace MANAGEMENT_ACCOUNT_ID with your management account ID.
If you are using the aws-meshplatform module, you can set support_root_account_via_aws_sso to add this statement.
When you initially import the root account, also consider setting up AWS Tenant Import to prepare the account for meshStack integration.
3. Set Up AWS Account 3: Automation
Create the MeshfedAutomationRole in the automation AWS account and add the policy below. This role is used for account bootstrapping via CloudFormation or Lambda.
{
    "Version": "2012-10-17",
    "Statement": [
        {
            "Sid": "AutomationPolicy",
            "Effect": "Allow",
            "Action": [
                "lambda:InvokeFunction",
                "cloudformation:UpdateStackInstances",
                "cloudformation:ListStackInstances",
                "cloudformation:DescribeStackSet",
                "cloudformation:CreateStackInstances"
            ],
            "Resource": "*"
        }
    ]
}
Add the trust relationship to the MeshfedAutomationRole. In the Principal section of the trust relationship, include only the ARN (User or Role) that matches your specific meshcloud AWS account setup (either Workload Identity Federation or an IAM user with credentials).
Replace the following placeholders with your specific values:
MESHCLOUD_ACCOUNT_ID: The ID of the dedicated meshcloud AWS account where you configured the workload identity provider or themeshfed-service-user.EXTERNAL_ID: The unique identifier defined previously in theMeshstackAssumeRolePolicy.
{
  "Version": "2012-10-17",
  "Statement": [
    {
      "Sid": "",
      "Effect": "Allow",
      "Principal": {
        "AWS": [
            "arn:aws:iam::<<MESHCLOUD_ACCOUNT_ID>>:role/MeshstackAssumeRoleIF",
            "arn:aws:iam::<<MESHCLOUD_ACCOUNT_ID>>:user/meshfed-service-user"
        ]
      },
      "Action": "sts:AssumeRole",
      "Condition": {
        "StringEquals": {
          "sts:ExternalId": "<<EXTERNAL_ID>>"
        }
      }
    }
  ]
}
In order to roll out CloudFormation Stack Instances in the newly provisioned accounts, create the AWSCloudFormationStackSetAdministrationRole as specified in the documentation and attach the following policy and trust relationship.
{
    "Version": "2012-10-17",
    "Statement": [
        {
            "Sid": "AllowAssumeCloudFormationExecutionOnAllAccounts",
            "Effect": "Allow",
            "Action": "sts:AssumeRole",
            "Resource": "arn:aws:iam::*:role/AWSCloudFormationStackSetExecutionRole"
        }
    ]
}
{
  "Version": "2012-10-17",
  "Statement": [
    {
      "Sid": "",
      "Effect": "Allow",
      "Principal": {
        "Service": "cloudformation.amazonaws.com"
      },
      "Action": "sts:AssumeRole"
    }
  ]
}
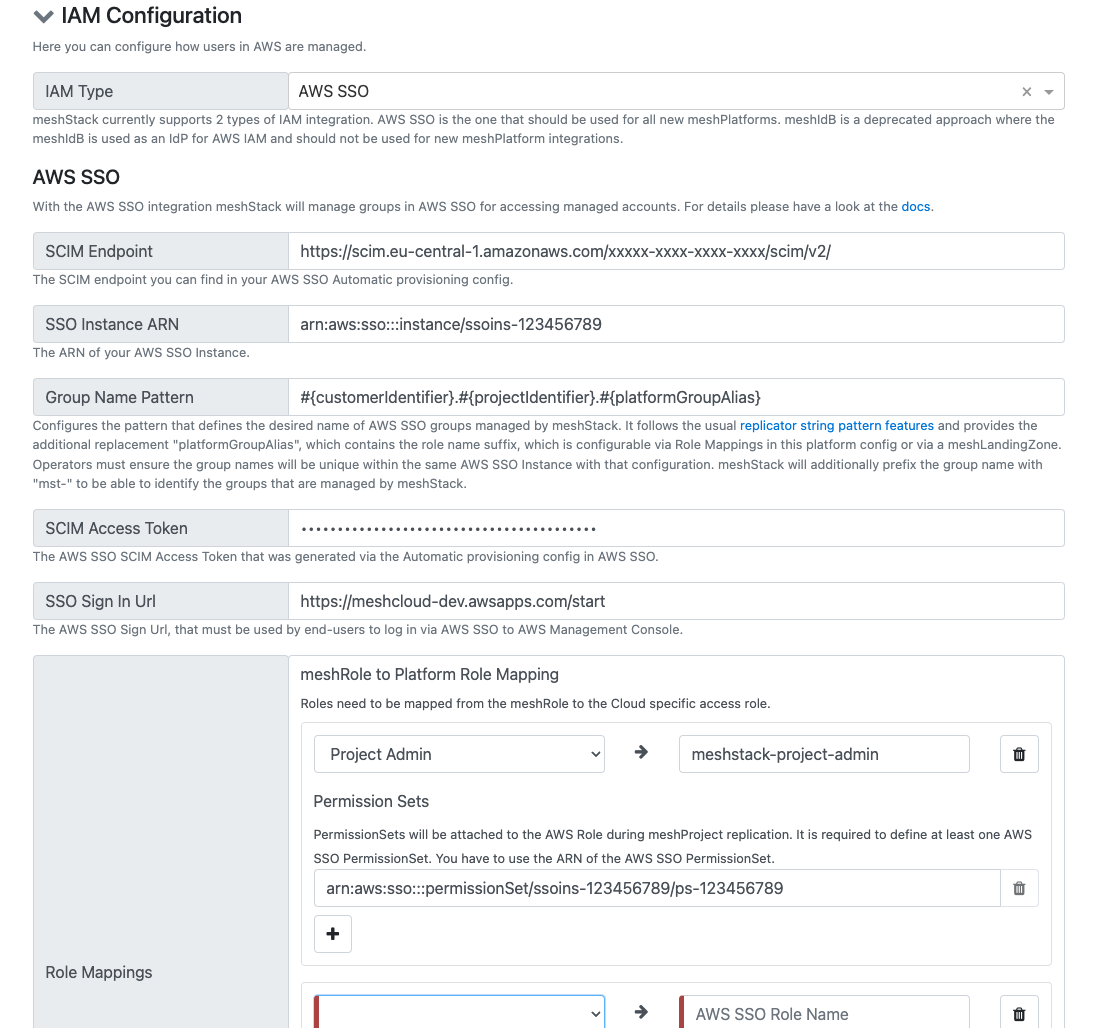
4. Set Up IAM Identity Center Integration
meshStack supports integrating with AWS IAM Identity Center (formerly AWS SSO) to manage user permissions on managed AWS Accounts. This means meshStack will create groups for every project role on a meshTenant in AWS IAM Identity Center and replicate user group membership to these groups. As a last step, meshStack assigns the created groups to the respective AWS account with configured PermissionSets.
If you do not want meshStack to manage IAM permissions for AWS accounts, you can set IAM Type to None in the AWS platform configuration. In this mode, meshStack still replicates AWS accounts, but skips IAM/group replication and account assignments in AWS IAM Identity Center.
Details about what needs to be configured inside AWS IAM Identity Center can be found here.
An important precondition, regarding the automated user provisioning to AWS SSO, is that the userName in AWS SSO has to be set to the euid. This limitation is caused by AWS SSO only allowing to filter userNames to find users. If a Microsoft Entra ID is used as External identity provider for AWS IAM Identity Center, that means the userPrincipalName in the Microsoft Entra ID must be set as the euid of meshStack users, as Microsoft Entra ID will always set the userName in AWS SSO to the userPrincipalName. This setup ensures the
euidis the universal identifier for users across all systems.
The following configuration options are available in the AWS Platform Replicator Config:
5. Configure Hierarchical Organizational Unit Assignment
meshStack supports hierarchical organizational unit assignment for AWS accounts, which provides more granular and flexible account organization within the AWS Organizations hierarchy.
By default, AWS accounts are placed directly in the organizational unit defined in the landing zone. When hierarchical assignment is enabled, accounts can remain in child organizational units below the OU defined in the landing zone.
This setting is configured in the AWS Platform Replicator Config and affects how meshStack handles account organization:
- When enabled (true): Accounts living in an organizational unit below the one defined in the landing zone will remain in their current organizational unit. This is useful for managing account locations with deeper and more granular hierarchy.
- When disabled (false): Accounts will always be moved directly to the organizational unit defined in the landing zone (only from root OU currently).
Platform operators can enable this feature by configuring the "Allow Hierarchical Organizational Unit Assignment" setting in the AWS platform configuration within meshPanel.
6. Decide on Naming Patterns
You can define naming patterns based on the String Templating syntax of meshStack for the following properties:
- Account Email Address: Please make sure to consider that this is limited to 64 characters
- Account Name Pattern: Please make sure to consider that the AWS Account Name is limited to 50 characters
:::note Deprecated fields
The fields accountAliasPattern and enforceAccountAlias are still accepted in the API for backward compatibility with existing configurations (e.g., Terraform provider). However, they are no longer applied during replication — meshStack no longer sets or updates AWS account aliases.
:::
7. Identifier Configuration
Platform engineers that want to use AWS must configure their deployment to restrict identifier lengths to meet AWS requirements. The maximum allowed lengths are:
customer_identifier_length: 16
project_identifier_length: 30
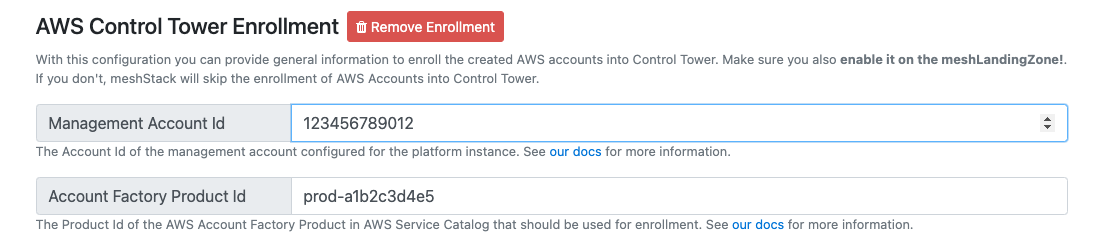
8. Integrate AWS Control Tower
A PlatformInstance can be configured to integrate with an existing AWS Control Tower setup.
In order to manage accounts created by meshStack with AWS Control Tower, these need to be "enrolled".
AWS Control Tower utilizes an Account Factory, to provide new accounts or enroll other accounts with it.
AWS Control Tower will create an Account Factory Product in AWS Service Catalog, that will be invoked to enroll accounts.
meshStack can be enabled to trigger the Account Factory via AWS Service Catalog.
The correct Id of the Account Factory Product needs to be specified in the enrollment configuration besides the management account Id.
meshStack will create new accounts as usual and in a later step will enroll them via the Account Factory with AWS Control Tower.
The following configuration options are available in the AWS Platform Replicator Config:
In order to enroll created accounts with AWS Control Tower, a Landing Zone must be configured. The
Target Organization Unit Idfrom the Landing Zone configuration must belong to a OU that is already enrolled with AWS Control Tower. Refer to Landing Zone Configuration for more information.
The following prerequisites must be fulfilled for the enrollment to work:
- A configured AWS Control Tower Service
- All AWS prerequisites
- AWS Service Catalog needs to have an AWS Control Tower Account Factory Portfolio
- The portfolio needs to contain an AWS Control Tower Account Factory Product
- The AWS Control Tower Account Factory Product needs to have at least one active Provisioned Artifact (active version)
- There needs to be a launch path with permissions to invoke the AWS Account Factory Product for meshStack access
MeshfedServiceRolerequires the attached policiesAWSServiceCatalogEndUserFullAccessandAWSServiceCatalogAdminReadOnlyAccessand in addition some extra permissions. These are also described in the AWS Docs. We recommend attaching another custom policy to theMeshfedServiceRolethat contains the following permissions:
{
  "Version": "2012-10-17",
  "Statement": [
    {
      "Sid": "AWSControlTowerAccountFactoryAccess",
      "Effect": "Allow",
      "Action": [
        "sso:GetProfile",
        "sso:CreateProfile",
        "sso:UpdateProfile",
        "sso:AssociateProfile",
        "sso:CreateApplicationInstance",
        "sso:GetSSOStatus",
        "sso:GetTrust",
        "sso:CreateTrust",
        "sso:UpdateTrust",
        "sso:GetPeregrineStatus",
        "sso:GetApplicationInstance",
        "sso:ListDirectoryAssociations",
        "sso:ListPermissionSets",
        "sso:GetPermissionSet",
        "sso:ProvisionApplicationInstanceForAWSAccount",
        "sso:ProvisionApplicationProfileForAWSAccountInstance",
        "sso:ProvisionSAMLProvider",
        "sso:ListProfileAssociations",
        "sso-directory:ListMembersInGroup",
        "sso-directory:AddMemberToGroup",
        "sso-directory:SearchGroups",
        "sso-directory:SearchGroupsWithGroupName",
        "sso-directory:SearchUsers",
        "sso-directory:CreateUser",
        "sso-directory:DescribeGroups",
        "sso-directory:DescribeDirectory",
        "sso-directory:GetUserPoolInfo",
        "controltower:CreateManagedAccount",
        "controltower:DescribeManagedAccount",
        "controltower:DeregisterManagedAccount",
        "controltower:ListLandingZones",
        "controltower:GetLandingZone",
        "s3:GetObject",
        "organizations:describeOrganization",
        "sso:DescribeRegisteredRegions"
      ],
      "Resource": "*"
    }
  ]
}
During the enrollment process, we create a new role in the tenant account that grants permissions to management account to perform AWS Control Tower execution steps. You have to make sure that there is no Service Control Policy (SCP) enabled in AWS Organizations that prevents that.
9. Set Minimum Access Rights on Provisioned Accounts
When provisioning a new account, a default role with administration privileges will be created in the new account. This role is by default named OrganizationAccountAccessRole
but the name can be configured via meshStack. The MeshfedServiceRole will assume this newly created role in the provisioned account to perform tasks such as setting up the user roles. meshStack has the capability to self downgrade this role's permissions to a minimum. This can be configured via the self-downgrade-access-role configuration flag.
The downgraded role will have the following final policy attached (Note that the accountId and accessRole placeholders need to be populated with the value of the current account id and the configured access role name).
{
  "Version": "2012-10-17",
  "Statement": [
    {
      "Effect": "Allow",
      "Action": [
        "iam:CreateSAMLProvider",
        "iam:GetSAMLProvider",
        "iam:UpdateSAMLProvider",
        "iam:DeleteSAMLProvider",
        "iam:ListSAMLProviders"
      ],
      "Resource": [
        "arn:aws:iam::{accountId}:saml-provider/*",
        "arn:aws:cloudformation:*:{accountId}:stack/meshstack-cf-access*"
      ]
    },
    {
      "Effect": "Allow",
      "Action": [
        "iam:ListAttachedRolePolicies",
        "iam:GetRole",
        "iam:CreateRole",
        "iam:AttachRolePolicy",
        "iam:UpdateAssumeRolePolicy"
      ],
      "Resource": "*"
    },
    {
      "Effect": "Allow",
      "Action": [
        "cloudformation:DescribeStacks"
      ],
      "Resource": "*"
    },
    {
      "Effect": "Allow",
      "Action": [
        "iam:DetachRolePolicy",
        "iam:DeleteRolePolicy",
        "iam:PutRolePolicy",
        "iam:ListRolePolicies"
      ],
      "Resource": "arn:aws:iam::{accountId}:role/{accessRole}"
    }
  ]
}
As you can see, meshStack has the permissions to upgrade this role if needed. This is to ensure that any new features added to the product will have the required permissions. Any newly added permissions will be notified via the product release notes.
If you prefer that meshStack does not have the capability to upgrade its own role, you can choose to implement your own role downgrade mechanism, for example via a Lambda call, which is also supported by meshLandingZones. In this case the role auto downgrade feature can be disabled.
If you would like to audit the actions taken by this role, you can enable AWS CloudTrail on all the accounts provisioned by meshStack by using an AWS CloudFormation StackSet, which is also supported by meshLandingZones. With the auditing enabled, it will always be possible to identify at which point in time meshStack added additional rights to its role. It will help to easily identify that meshStack was only able to do certain actions given the rights assigned at a certain point in time.
10. Metering
To set up metering, follow a process similar to the MeshfedServiceRole integration:
- Configure an Identity Provider (preferred) or IAM user in the meshcloud account.
- Create a role in the AWS management account (referred to hereafter as the
MeteringRole) and attach the required policies.
- MeshCostExplorerServiceRole's Access Policy: This policy allows the meshcloud AWS account to call the AWS Cost Explorer API from the management account to read data required for metering. Note that Savings Plan and Reserved Instance related permissions are needed only if you have specific meshWorkspaces buying those directly, and you need to implement a cash-flow based Chargeback process for those. See Reserved Instances & Savings Plans Guide for more details.
- CostExplorerPolicy: This policy allows IAM identity provider to assume the IAM Role
MeshCostExplorerServiceRole
CostExplorerPolicy
In the meshcloud AWS account, create a policy CostExplorerPolicy as follows:
{
  "Version": "2012-10-17",
  "Statement": [
    {
      "Sid": "",
      "Effect": "Allow",
      "Principal": {
        "AWS": "arn:aws:iam::<<MANAGEMENT_ACCOUNT_ID>>:role/MeshCostExplorerServiceRole"
      },
      "Action": "sts:AssumeRole",
      "Condition": {
        "StringEquals": {
          "sts:ExternalId": "<<EXTERNAL_ID_METERING>>"
        }
      }
    }
  ]
}
Navigate to IAM > Identity Providers and create a new OpenID Connect provider. Enter the "Provider URL" and "Audience" values found in the meshStack AWS platform configuration panel. You can find these under the Metering Configuration section when Workload Identity Federation is selected (corresponding to the issuer and audience parameters). Create a new identity federation role CostExplorerRole and attach the new policy CostExplorerPolicy. Add following trust relationship to the new role.
{
  "Version": "2012-10-17",
  "Statement": [
      {
          "Effect": "Allow",
          "Principal": {
              "Federated": "<meshStack identity provider ARN>"
          },
          "Action": "sts:AssumeRoleWithWebIdentity",
          "Condition": {
              "StringEquals": {
                  "<meshStack identity provider name>:sub": "<replicator subject from meshStack>",
                  "<meshStack identity provider name>:aud": "<audience from meshStack>"
              }
          }
      }
  ]
}
MeshCostExplorerServiceRole
In the management AWS account, create a role MeshCostExplorerServiceRole with following policy and trust relationship:
{
  "Version": "2012-10-17",
  "Statement": [
      {
        "Sid": "",
        "Effect": "Allow",
        "Action": [
            "ce:GetSavingsPlansUtilizationDetails",
            "ce:GetSavingsPlansUtilization",
            "ce:GetSavingsPlansCoverage",
            "ce:GetReservationUtilization",
            "ce:GetReservationCoverage",
            "ce:GetDimensionValues",
            "ce:GetCostAndUsage",
            "organizations:ListAccounts"
          ],
        "Resource": "*"
      }
  ]
}
Change the placeholders with appropriate values.
{
  "Version": "2012-10-17",
  "Statement": [
    {
      "Sid": "",
      "Effect": "Allow",
      "Principal": {
        "AWS": "arn:aws:iam::<<MESHCLOUD_ACCOUNT_ID>>:role/CostExplorerRole"
      },
      "Action": "sts:AssumeRole",
      "Condition": {
        "StringEquals": {
          "sts:ExternalId": "<<EXTERNAL_ID_METERING>>"
        }
      }
    }
  ]
}
It is also possible to use an IAM user instead of workload identity federation. For that, create an IAM user cost-explorer-user in the meshcloud account, attach the policy CostExplorerPolicy to the user. Finally, update the principal in the trust relationship above to arn:aws:iam::<<MESHCLOUD_ACCOUNT_ID>>:user/cost-explorer-user
11. Leverage Reserved Instances & Savings Plans (Optional)
This section applies only if your application teams (represented by meshWorkspaces) pay you (the Cloud Foundation team), upfront to purchase Reserved Instances
and Savings Plans directly on their AWS accounts, which give them priority for consuming the RI or SP.
If this is the case, you can enable reservedInstanceFairChargeback and savingsPlanFairChargeback feature
flags to achieve the following. See Reserved Reserved Instances & Savings Plans Guide for more details.
The upfront payments will be shown as line items in the tenant usage report for the month on which the Reserved Instance or Savings Plan starts.
meshStack also adds a discount which is equal to the amortized upfront cost to the relevant tenant usage report.
This line item will be added to the report every month until the end of the Reserved Instances or Savings Plan period.
To achieve this, meshStack collects the information about Reserved Instances and Savings Plans via the cost explorer API.
12. Set Up AWS Tenant Import (Optional)
To import an unmanaged AWS account into a workspace and project, the account must be configured for meshStack integration. This configuration involves setting up an IAM role with a trust relationship to the root or master account of the AWS organization to which the account belongs.
Create the IAM role named MeshstackAccountAccessRole in the unmanaged account and assign the AWS managed IAM Policy AdministratorAccess to it. Once the account import is complete, the IAM role's permissions will be reduced to the required level.
Add the following trust relationship to the IAM role MeshstackAccountAccessRole, substituting MANAGEMENT_ACCOUNT_ID with the AWS account ID of the organization's master or root account.
{
  "Version": "2012-10-17",
  "Statement": [
    {
      "Effect": "Allow",
      "Principal": {
        "AWS": "arn:aws:iam::<MANAGEMENT_ACCOUNT_ID>:role/MeshfedServiceRole"
      },
      "Action": "sts:AssumeRole"
    }
  ]
}
Once the role is established, the unmanaged AWS account can be assigned to a project, allowing you to proceed with the steps outlined above.